TENSORFLOW MODEL ZOO MODELS ON NUS HPC CONTAINERS

Introduction
Tensorflow provides pre-built and pre-trained models in the Tensorflow Models repository for the public to use.
The official models are a collection of example models that use TensorFlow’s high-level APIs. They are intended to be well-maintained, tested, and kept up to date with the latest stable TensorFlow API. They should also be reasonably optimised for fast performance while still being easy to read.
The research models are a large collection of models implemented in TensorFlow by researchers.
The provided models allow you to get started applying Deep Learning to create solutions without needing to program an entire neural network architecture from scratch.
This article serves as a quick guide to get you started on using the Tensorflow Model Zoo models on NUS HPC. We will use the Tensorflow Object Detection API (https://github.com/tensorflow/models/tree/master/research/object_detection) which is a research model in Model Zoo.
The Tensorflow version used in this article is 1.14 from the following container:
/app1/common/singularity-img/3.0.0/tensorflow_1.14_cuda10.0-cudnn7-dev-ubuntu18.04.simg
Setting Up
First, you must download the Tensorflow Models repository to your HPC home directory either by using:
git clone https://github.com/tensorflow/models.git
Or by downloading the repository as a zip folder and unzipping it in your HPC home directory.
There are sections in this article where you can run your code in an interactive session on Volta01. This means that you can launch an interactive job, execute the container using the following command then follow the instructions to execute code in the relevant sections in this article.
singularity exec /app1/common/singularity-img/3.0.0/tensorflow_1.14_cuda10.0-cudnn7-dev-ubuntu18.04.simg bash
COCO API installation
Download the cocoapi and copy the pycocotools subfolder to the tensorflow/models/research directory. To use the COCO object detection metrics, add metrics_set: “coco_detection_metrics” to the eval_config message in the config file. To use the COCO instance segmentation metrics add metrics_set: “coco_mask_metrics” to the eval_config message in the config file.
# In atlas8
pip install --user Cython pycocotools lxml contextlib2
git clone https://github.com/cocodataset/cocoapi.git
# in interactive session on volta01
cd cocoapi/PythonAPI
make
cp -r pycocotools /models/research/
Protobuf Compilation
The Tensorflow Object Detection API uses Protobufs to configure model and training parameters. Before the framework can be used, the Protobuf libraries must be compiled. This should be done by running the following command from the tensorflow/models/research/ directory:
# From tensorflow/models/research/ done in interactive session on Volta01protoc object_detection/protos/*.proto --python_out=.
Getting the dataset
The raw dataset for Oxford-IIIT Pets lives here. You will need to download both the image dataset images.tar.gz and the groundtruth data annotations.tar.gz to the tensorflow/models/research/ directory and unzip them. This may take some time.
# From tensorflow/models/research/
wget http://www.robots.ox.ac.uk/~vgg/data/pets/data/images.tar.gz
wget http://www.robots.ox.ac.uk/~vgg/data/pets/data/annotations.tar.gz
tar -xvf images.tar.gz
tar -xvf annotations.tar.gz
Converting to TFRecords
The Tensorflow Object Detection API expects data to be in the TFRecord format, so we’ll now run the create_pet_tf_record script to convert from the raw Oxford-IIIT Pet dataset into TFRecords. Run the following commands from the tensorflow/models/research/ directory:
# From tensorflow/models/research/ done in interactive session on Volta01
python object_detection/dataset_tools/create_pet_tf_record.py \
    --label_map_path=object_detection/data/pet_label_map.pbtxt \
    --data_dir=`pwd` \    --output_dir=`pwd`
# make a directory called data
mkdir datamv pet_faces* data/
cp object_detection/data/pet_label_map.pbtxt data/
Downloading a COCO-pretrained Model for Transfer Learning
In order to speed up training, we’ll take an object detector trained on a different dataset (COCO), and reuse some of its parameters to initialize our new model.
Download the COCO-pretrained Faster R-CNN with Resnet-101 model. Unzip the contents of the folder.
# From tensorflow/models/research/ done in Atlas8
mkdir object_detection_pretrained
cd object_detection_pretrained
wget http://storage.googleapis.com/download.tensorflow.org/models/object_detection/faster_rcnn_resnet101_coco_11_06_2017.tar.gz
tar -xvf faster_rcnn_resnet101_coco_11_06_2017.tar.gz
mv faster_rcnn_resnet101_coco_11_06_2017/model.ckpt.* data/
Configuring the Object Detection Pipeline
In the Tensorflow Object Detection API, the model parameters, training parameters and eval parameters are all defined by a config file. More details can be found here. For this tutorial, we will use some predefined templates provided with the source code.
In the object_detection/samples/configs folder, there are skeleton object_detection configuration files. We will use faster_rcnn_resnet101_pets.config as a starting point for configuring the pipeline. Open the file with your favourite text editor.
We’ll need to configure some paths for the template to work. Search the file for instances of PATH_TO_BE_CONFIGURED and replace them with the appropriate value (path to the data/ folder created earlier)
# From tensorflow/models/research/ done in Atlas8
$ sed -i "s|PATH_TO_BE_CONFIGURED|/path_to/data|g" object_detection/samples/configs/faster_rcnn_resnet101_pets.config
$ cp object_detection/samples/configs/faster_rcnn_resnet101_pets.config /path_to/data
Check your Data Folder
+ data/
    - faster_rcnn_resnet101_pets.config
    - model.ckpt.index
    - model.ckpt.meta
    - model.ckpt.data-00000-of-00001
    - pet_label_map.pbtxt
    - pet_faces_train.record-*
    - pet_faces_val.record-*
Training
Add Libraries to PYTHONPATH
When running locally, the tensorflow/models/research/ and slim directories should be appended to PYTHONPATH. This can be done by running the following from tensorflow/models/research/:
# From tensorflow/models/research/ in interactive session on Volta01
export PYTHONPATH=$PYTHONPATH:`pwd`:`pwd`/slim
Executing Training
# From tensorflow/models/research/ in interactive session on Volta01
python object_detection/model_main.py \
--pipeline_config_path=/path/to/data/faster_rcnn_resnet101_pets.config \
--num_train_steps=500 --sample_1_of_n_eval_examples=1 \
--alsologtostderr --model_dir=/path/to/data/model_dir/
Please change /path/to/data/ to the path to the data directory you have created.
You can also change the num_train_steps to another value.

The following is the job script for running the training on the volta_gpu batch queue.
PBS Batch Job Script
#!/bin/bash
#PBS -l select=1:mem=50gb:ncpus=10:ngpus=1
#PBS -l walltime=14:00:00
#PBS -q volta_gpu
### Specify correct Project ID:
#PBS -P Volta_gpu_demo
#PBS -N DCGAN_demo_cpu10
#PBS -j oe

# Singularity image to us
# Other images available in /app1/common/singularity-img/3.0.0/
image="/app1/common/singularity-img/3.0.0/tensorflow_1.12_nvcr_19.01-py3.simg"

# Change to directory where job was submitte
if [ x"$PBS_O_WORKDIR" != x ] ; then
  cd "$PBS_O_WORKDIR" || exit $?
fi

np=`cat $PBS_NODEFILE | wc -l`

singularity exec $image bash << EOF > stdout.$PBS_JOBID 2> stderr.$PBS_JOBID
#insert commands here
export PYTHONPATH=$PYTHONPATH:`pwd`:`pwd`/slim

# From tensorflow/models/research
python object_detection/model_main.py \
--pipeline_config_path=/path/to/data/faster_rcnn_resnet101_pets.config \
--num_train_steps=10000 --sample_1_of_n_eval_examples=1 \
--alsologtostderr --model_dir=/path/to/data/model_dir/
EOF
Inference
Exporting Trained Model
After your model has been trained, you should export it to a Tensorflow graph proto. First, you need to identify a candidate checkpoint to export.
The file should be stored under /path/to/data/model_dir. The checkpoint will typically consist of three files:
- ckpt-${CHECKPOINT_NUMBER}.data-00000-of-00001
- ckpt-${CHECKPOINT_NUMBER}.index
- ckpt-${CHECKPOINT_NUMBER}.meta
After you’ve identified a candidate checkpoint to export, run the following command in interactive session on Volta01 from tensorflow/models/research/:
python object_detection/export_inference_graph.py \
--input_type image_tensor \
--pipeline_config_path=/path/to/data/faster_rcnn_resnet101_pets.config \
--trained_checkpoint_prefix=/path/to/data/model_dir/model.ckpt-{CHKPOINT_NUM} \
--output_directory=/path/to/data/exported_graphs
When completed it should look like this:

With the following files in the exported_graph folder:
- checkpoint
- pb
- ckpt.data-00000-of-00001
- ckpt.index
- ckpt.meta
- config
- saved_model
Detecting Objects in an Image

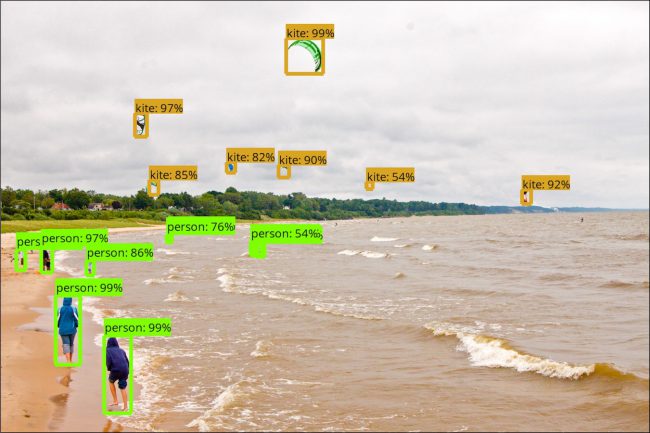
The following script takes in an image, the frozen graph as well as label file and produces an image like the above. It’ll draw bounding boxes over detections. You can run the inference by launching an interactive session on Volta01.
Usage is as follows:
python obj_detect_infer.py /path/to/frozen_graph.pb \
/path/to/data/pet_label_map.pbtxt /path/to/image_to_infer.jpg
Script:
import numpy as np
import os
import six.moves.urllib as urllib
import sys
import tarfile
import tensorflow as tf
import zipfile

from distutils.version import StrictVersion
from collections import defaultdict
from io import StringIO
import matplotlib
matplotlib.use('Agg')
from matplotlib import pyplot as plt

from PIL import Image
# This is needed since the notebook is stored in the object_detection folder.
sys.path.append("..")
from object_detection.utils import ops as utils_ops
from utils import label_map_util
from utils import visualization_utils as vis_util

def load_image_into_numpy_array(image):
  (im_width, im_height) = image.size
  return np.array(image.getdata()).reshape(
    (im_height, im_width, 3)).astype(np.uint8)

# Load label map
def load_label_map(path_to_labelmap):
    category_index = label_map_util.create_category_index_from_labelmap(path_to_labelmap, use_display_name=True)
    return category_index

def run_inference_for_single_image(image, graph):
  with graph.as_default():
    with tf.Session() as sess:
      # Get handles to input and output tensors
      ops = tf.get_default_graph().get_operations()
      all_tensor_names = {output.name for op in ops for output in op.outputs}
      tensor_dict = {}
      for key in [
          'num_detections', 'detection_boxes', 'detection_scores',
          'detection_classes', 'detection_masks'
      ]:
        tensor_name = key + ':0'
        if tensor_name in all_tensor_names:
          tensor_dict[key] = tf.get_default_graph().get_tensor_by_name(
              tensor_name)
      if 'detection_masks' in tensor_dict:
        # The following processing is only for single image
        detection_boxes = tf.squeeze(tensor_dict['detection_boxes'], [0])
        detection_masks = tf.squeeze(tensor_dict['detection_masks'], [0])
        # Reframe is required to translate mask from box coordinates to image coordinates and fit the image size.
        real_num_detection = tf.cast(tensor_dict['num_detections'][0], tf.int32)
        detection_boxes = tf.slice(detection_boxes, [0, 0], [real_num_detection, -1])
        detection_masks = tf.slice(detection_masks, [0, 0, 0], [real_num_detection, -1, -1])
        detection_masks_reframed = utils_ops.reframe_box_masks_to_image_masks(
        detection_masks, detection_boxes, image.shape[1], image.shape[2])
        detection_masks_reframed = tf.cast(
            tf.greater(detection_masks_reframed, 0.5), tf.uint8)
        # Follow the convention by adding back the batch dimension
        tensor_dict['detection_masks'] = tf.expand_dims(
            detection_masks_reframed, 0)
      image_tensor = tf.get_default_graph().get_tensor_by_name('image_tensor:0')

      # Run inference
      output_dict = sess.run(tensor_dict,
                               feed_dict={image_tensor: image})

      # all outputs are float32 numpy arrays, so convert types as appropriate
      output_dict['num_detections'] = int(output_dict['num_detections'][0])
      output_dict['detection_classes'] = output_dict[
          'detection_classes'][0].astype(np.int64)
      output_dict['detection_boxes'] = output_dict['detection_boxes'][0]
      output_dict['detection_scores'] = output_dict['detection_scores'][0]
      if 'detection_masks' in output_dict:
        output_dict['detection_masks'] = output_dict['detection_masks'][0]
      return output_dict

def main(path_to_frozen_graph, label_map, path_to_image):
    # Load frozen graph
    print("Loading graph from %s" % path_to_frozen_graph)
    detection_graph = tf.Graph()
    with detection_graph.as_default():
      od_graph_def = tf.GraphDef()
      with tf.gfile.GFile(path_to_frozen_graph, 'rb') as fid:
      serialized_graph = fid.read()
      od_graph_def.ParseFromString(serialized_graph)
      tf.import_graph_def(od_graph_def, name='')

    # load label map
    print("Loading label map from %s" % label_map)
    category_index = load_label_map(label_map)

    # images
    IMAGE_SIZE = (12, 8)

    print("Loading image from %s " % path_to_image)
    image = Image.open(path_to_image)
    # the array based representation of the image will be used later in order to prepare the
    # result image with boxes and labels on it.
    image_np = load_image_into_numpy_array(image)
    # Expand dimensions since the model expects images to have shape: [1, None, None, 3]
    image_np_expanded = np.expand_dims(image_np, axis=0)
    # Actual detection.
    print("Running inference.")
    output_dict = run_inference_for_single_image(image_np_expanded, detection_graph)
    # Visualization of the results of a detection.
    img_np = vis_util.visualize_boxes_and_labels_on_image_array(
      image_np,
      output_dict['detection_boxes'],
      output_dict['detection_classes'],
      output_dict['detection_scores'],
      category_index,
      instance_masks=output_dict.get('detection_masks'),
      use_normalized_coordinates=True,
      line_thickness=8)
    plt.figure(figsize=IMAGE_SIZE)
    plt.imsave("inferred_image.jpg", img_np)

if __name__ == '__main__':
    path_to_frozen_graph = sys.argv[1].rstrip()
    label_map = sys.argv[2].rstrip()
    path_to_image = sys.argv[3].rstrip()
    main(path_to_frozen_graph, label_map, path_to_image)
Conclusion
Google provides pretrained Tensorflow models for a variety of tasks. An object detection pipeline can be easily built and deployed using the provided pretrained models in the Tensorflow Model Zoo repository.

