Using Detectron2 on HPC
Ku Wee Kiat, Research Computing, NUS IT
Introduction
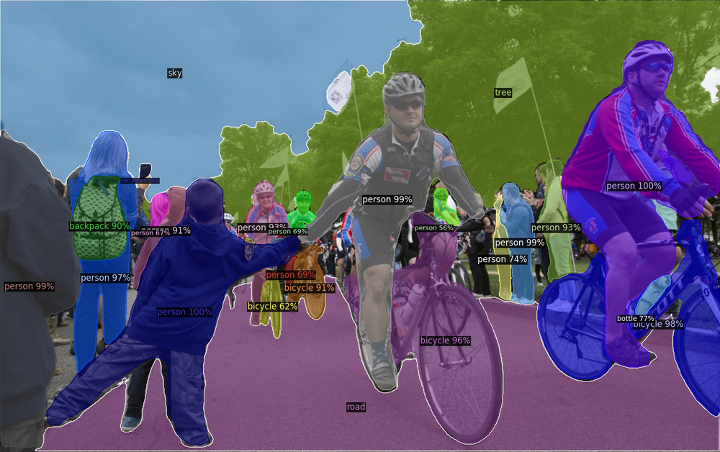
Detectron2 is Facebook AI Research’s next generation library that provides state-of-the-art detection and segmentation algorithms. It supports several computer vision research projects and production applications at Facebook.
Models and features: Detectron2 includes all the models that were previously available in the original Detectron, such as Faster R-CNN, Mask R-CNN, RetinaNet, and DensePose. It also features several new models, like Cascade R-CNN, Panoptic FPN, and TensorMask.
Tasks: Detectron2 supports a range of tasks related to object detection. Like the original Detectron, it supports object detection with boxes and instance segmentation masks, as well as human pose prediction. Beyond that, Detectron2 adds support for semantic segmentation and panoptic segmentation, a task that combines both semantic and instance segmentation. (“Detectron2: A PyTorch-based modular object detection library”)
Speed and scalability: By moving the entire training pipeline to GPU, FAIR was able to make Detectron2 faster than the original Detectron for a variety of standard models. Additionally, distributing training to multiple GPU servers is now easier, making it much simpler to scale training to large datasets. (“Detectron2: A PyTorch-based modular object detection library”)
Detectron2go: Facebook AI’s computer vision engineers have implemented an additional software layer, Detectron2go, to make it easier to deploy advanced new models to production. “These features include standard training workflows with in-house datasets, network quantisation, and model conversion to optimised formats for cloud and mobile deployment.” (“Detectron2: A PyTorch-based modular object detection library”)
There are increasing requests to install and enable Detectron2 on NUS HPC for use on the GPU cluster. In this article we will explore how to use Detectron2 on NUS HPC.

Detectron2 Container on NUS HPC
At NUS HPC, we have containers for each version of a deep learning framework. For example, Pytorch 1.4, Pytorch 1.5, and so on, each of them is contained within their own Singularity container. Any deep learning project/code that you want to run will be executed in the appropriate Singularity container.
The Detectron2-enabled Pytorch container is available at the following path: /app1/common/singularity-img/3.0.0/pytorch_1.9_cuda11.1_detectron2-py38.sif
Let us know if there is a different version of Detectron2 you would like us to make available.
Downloading Detectron2 Models
Like many other deep learning frameworks, Detectron2 automatically downloads the pre-trained weights from the internet for the model you selected when it tries to load the model. Unfortunately, there is no internet access on the GPU cluster on NUS HPC, so we would need to manually download the weights that are needed and upload it to the cluster.
Even on an internet enabled server, Detectron2 does not store the downloaded weights on disk. Every single time you load a pre-trained model, it will download the weights from the internet.
To make things easier, let us download the weights and store them somewhere in /hpctmp/your_nusnet_id/
The URL paths to the weights are in the model zoo code. You would need to download the weights file that corresponds to the model config that you will be using.
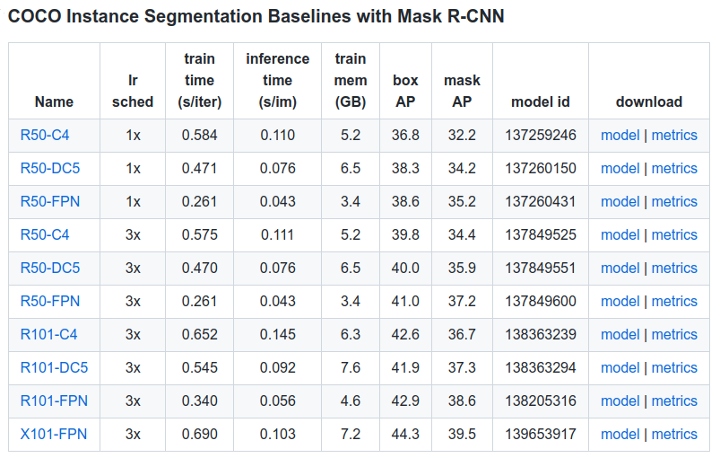
For example, the model configuration of your choosing could be “COCO-InstanceSegmentation/mask_rcnn_R_50_FPN_3x.yaml”
All the information about the pre-trained models is available here, including the URL to download the model. Below are two methods of obtaining the right model weights.
Method 1
The first method is to access this web page and scroll to the section which contains the table of the main model you will be using. In this case it would be “COCO Instance Segmentation Baselines with Mask R-CNN”. Within the table there is the Name column and lr sched column which will be stated in the config file name as well, e.g.: Name: R50-FPN, lr sched: 3x. You can download the corresponding weights file under the model link in the download column.

Method 2
Alternatively, you can use the following script to download your desired model of choice given the path to a built in Detectron2 model config (e.g.: InstanceSegmentation/mask_rcnn_R_50_FPN_3x.yaml) and a folder to save the weights to (e.g.: detectron2_weights/ ).
import sys
import sys
import os
import detectron2.model_zoo as mz
import torchvision.datasets.utils.download_url as download_url

def main(cfg_path, weights_folder):
    os.makedirs(weights_folder), exist_ok=True)
    weights_url = mv.get_checkpoint_url(cfg_path)
    download_url(weights_url, root=weights_folder)


if __name__ == '__main__':
    try:
        cfg_path = sys.srgv[1].rstrip() # "COCO-InstanceSegmentation/mask_rcnn_R_50_FPN_3x.yaml"
        weights_folder = sys.argv[2].rstrip()
    except Exception as e:
        print(f'Usage: python {sys.argv[0].rstrip()} config_path weights_folder')
        print(f'Example:\n python {sys.argv[0].rstrip()} COCO-InstanceSegmentation/mask_rcnn_R_50_FPN_3x.yaml detectron2_weights/')
        sys.exit()

 main(cfg_path, weights_folder)
For example, the following was executed on Atlas8 Login node:
user@atlas8-c01 ~$ singularity exec /app1/common/singularity-img/3.0.0/pytorch_1.9_cuda11.1_detectron2-py38.sif bash

Singularity> python download_weights.py COCO-InstanceSegmentation/mask_rcnn_R_50_FPN_3x.yaml detectron2_weights

Downloading https://dl.fbaipublicfiles.com/detectron2/COCO-InstanceSegmentation/mask_rcnn_R_50_FPN_3x/137849600/model_final_f10217.pkl to detectron2_weights/model_final_f10217.pkl
177842176it [00:23, 7692543.50it/s]
Once you have downloaded the weights and stored it in a folder of your choosing, you can now load the weights with the following code snippet in your detectron2 code. If you have saved the weights to “weights/model_final_f10217.pkl”.
Loading the Weights
cfg = get_cfg()
cfg.merge_from_file(model_zoo.get_config_file("COCO-InstanceSegmentation/mask_rcnn_R_50_FPN_3x.yaml"))

cfg.MODEL.ROI_HEADS.SCORE_THRESH_TEST = 0.5

weights_path = "weights/model_final_f10217.pkl"
cfg.MODEL.WEIGHTS = os.path.join(weights_path)
predictor = DefaultPredictor(cfg)
Sample Inference Project
In this section we will show how to run a simple inference project using pre-trained weights provided by Detectron2.
- Login to Atlas9 login node.
- Save the code below in a python file and upload it to your HPC home directory or /hpctmp/your_nusnet_id directory.
import torch

import os
import torchvision
import detectron2
from detectron2.utils.logger import setup_logger
setup_logger()

# import some common libraries
import numpy as np
import os, json, cv2, random

# import some common detectron2 utilities
from detectron2 import model_zoo
from detectron2.engine import DefaultPredictor
from detectron2.config import get_cfg
from detectron2.utils.visualizer import Visualizer
from detectron2.data import MetadataCatalog, DatasetCatalog

weights_path = "weights/model_final_f10217.pkl"

im = cv2.imread("./input.jpg")

cfg = get_cfg()
cfg.merge_from_file(model_zoo.get_config_file("COCO-InstanceSegmentation/mask_rcnn_R_50_FPN_3x.yaml"))
cfg.MODEL.ROI_HEADS.SCORE_THRESH_TEST = 0.5  # set threshold for this model

# Find a model from detectron2's model zoo. You can use the https://dl.fbaipublicfiles... url as well
cfg.MODEL.WEIGHTS = os.path.join(weights_path)
predictor = DefaultPredictor(cfg)
outputs = predictor(im)

print(outputs["instances"].pred_classes)
print(outputs["instances"].pred_boxes)

v = Visualizer(im[:, :, ::-1], MetadataCatalog.get(cfg.DATASETS.TRAIN[0]), scale=1.2)
out = v.draw_instance_predictions(outputs["instances"].to("cpu"))
cv2.imwrite("out.png", out.get_image()[:, :, ::-1])
3. Open a separate terminal and login to Atlas8 login node.
4. Follow Method 2 to download the pre-trained weights for Mask RCNN R50 FPN model.
5. On Atlas9, tweak the inference script’s weights_path variable to point to where you have downloaded the pre-trained weights in step 4.
6. Use the sample job script below to configure your preferred hardware setting and inference script to execute
#!/bin/bash
#PBS -l select=1:mem=60gb:ncpus=10:ngpus=1
#PBS -l walltime=0:20:00
#PBS -q volta_gpu
#PBS -P Volta_gpu_demo
#PBS -N Detectron2_inference
#PBS -j oe

# Singularity image to use
# Other images available in /app1/common/singularity-img/3.0.0/
image="/app1/common/singularity-img/3.0.0/pytorch_1.9_cuda11.1_detectron2-py38.sif"

# Change to directory where job was submitted
export OMP_NUM_THREADS=$NCPUS

singularity exec $image bash << EOF > stdout.$PBS_JOBID 2> stderr.$PBS_JOBID
#insert commands here
python inference_demo.py
EOF
7. Submit the job script to the scheduler.
You can try out the Detectron2 tutorial notebook on the GPU cluster, however you would need to do some modifications to remove or modify the lines that access the internet.
